How to Grow Roses from Softwood Cuttings: Step-by-Step Success Guide
Learn how to grow roses from softwood cuttings with this step-by-step guide. Perfect for beginners seeking healthy, thriving rose plants at home.
How to Grow Stunning Roses from Softwood Cuttings: A Beginner-Friendly Guide
Have you ever gazed at the vibrant blossoms of a rose bush and thought about cultivating your own beautiful roses at home? The good news is that you don’t need to purchase expensive nursery plants or have years of gardening experience. Growing roses from softwood cuttings is a straightforward, budget-friendly, and highly rewarding method that even novice gardeners can master.
Softwood cuttings, taken from the fresh, flexible growth of a rose bush, root more easily than hardwood cuttings and can yield robust, healthy plants. This propagation technique allows you to multiply your favorite rose varieties, preserve heirloom roses, or share special blooms with friends and family—all without breaking the bank.
In this comprehensive, step-by-step guide, you’ll discover:
- The best time to take softwood rose cuttings for optimal results
- Essential tools and supplies you’ll need to get started
- How to select and prepare healthy rose cuttings
- Step-by-step instructions for rooting and caring for your new rose plants
- Common mistakes to avoid and troubleshooting tips for successful propagation
Whether you’re hoping to fill your garden beds with fragrant floribundas, create a stunning rose hedge, or simply enjoy the satisfaction of nurturing plants from scratch, this guide is tailored to help you succeed. By following these clear instructions and helpful tips, you’ll soon be enjoying your own homegrown roses—perfect for cutting, gifting, or simply admiring in your landscape.
Let’s dive in and unlock the secrets to growing thriving roses from softwood cuttings, transforming your garden into a haven of color and scent!
Advantages of Propagating Roses from Softwood Cuttings
Propagating roses from softwood cuttings is a popular and rewarding method for both beginner and experienced gardeners. This technique allows you to create new rose plants that are exact genetic replicas of the parent plant, ensuring the preservation of beloved varieties with their unique colors, fragrances, and growth patterns. Whether you have a favorite rose bush in your yard or want to share a cherished variety with friends, growing roses from cuttings offers several compelling benefits.
One of the primary advantages is consistency. Since roses grown from cuttings are clones of the original plant, you can be confident that your new roses will exhibit the same stunning blooms, delightful scents, and resilient growth habits. This is especially important if you want to maintain specific rose qualities that might be lost through other propagation methods like seed-growing, where genetic variation can occur.
Growing roses from softwood cuttings is also cost-effective. Instead of purchasing mature rose plants, which can be expensive, you can multiply your collection at little to no cost using materials you already have in your garden. This method makes it easy to expand your rose garden or share plants with friends and family.
Key Benefits of Softwood Cuttings
Softwood cuttings, taken from the fresh, green growth in late spring or early summer, offer unique advantages:
- Faster Rooting: Softwood cuttings tend to develop roots more quickly than hardwood cuttings, reducing the waiting time before you see new growth.
- Higher Success Rates: The tender stems root more readily during the active growing season, increasing your chances of successful propagation.
- Versatility: This technique works well for many popular rose varieties, making it a versatile option for gardeners with diverse tastes.
- Minimal Equipment Needed: Propagating from cuttings requires only basic gardening tools and supplies, such as a sharp knife, rooting hormone (optional), and a suitable growing medium.
- Sustainability: By propagating your own roses, you reduce reliance on commercial nurseries and help preserve heirloom or rare varieties.
Why Choose Softwood Over Other Methods?
While there are several ways to propagate roses—such as from seeds, hardwood cuttings, or budding—softwood cuttings offer a unique blend of speed and reliability:
| Propagation Method | Time to Root | Success Rate | Plant Consistency | Ideal Season |
|---|---|---|---|---|
| Seeds | Slow | Low | Variable | Late autumn/winter |
| Hardwood Cuttings | Moderate | Moderate | High | Late autumn/winter |
| Softwood Cuttings | Fast | High | High | Spring/Summer |
Choosing softwood cuttings means you can enjoy new, thriving rose plants in the same season, often seeing roots form within weeks. This method’s simplicity, affordability, and reliability make it ideal for anyone eager to enhance their garden with beautiful, healthy roses.
Understanding Softwood Cuttings: Definition and Key Characteristics
Softwood cuttings are a popular and effective propagation method used by both amateur gardeners and professional horticulturists to multiply a wide variety of plants. These cuttings are taken from the soft, new growth of a plant, typically during late spring to early summer when the stems have matured just enough to be firm but are still pliable and actively growing. This timing ensures that the plant material is neither too tender (which can lead to wilting and rot) nor too woody (which can make rooting more difficult).
What Makes a Cutting "Softwood"?
Softwood refers to the stage of growth in a plant's stem rather than the type of plant (as in coniferous "softwood" trees). At this phase:
- Texture: The stems are soft and flexible, capable of bending without breaking.
- Color: They often exhibit a vibrant, bright green hue, a sign of healthy, active growth.
- Source: Softwood comes from the current season’s new shoots rather than older, more mature plant sections.
Why Choose Softwood Cuttings?
Softwood cuttings are preferred for many plants because they root more quickly and easily than hardwood or semi-hardwood cuttings. They also allow you to propagate plants at a time when growth hormones are naturally high, increasing the chances of successful rooting.
Ideal Plants for Softwood Cuttings
Many popular garden plants can be propagated using softwood cuttings, including:
- Shrubs: Hydrangeas, Forsythia, Weigela, Buddleia (Butterfly Bush)
- Perennials: Lavender, Salvia, Fuchsia
- Herbs: Rosemary, Mint, Sage
How to Identify the Perfect Softwood Cutting
To ensure you are selecting the ideal stem for a softwood cutting, check the following:
| Characteristic | Description | Indicator |
|---|---|---|
| Flexibility | Bends easily without snapping | Gently bend stem; should flex |
| Color | Fresh, bright green | Look for vibrant new growth |
| Firmness | Not too soft, not too woody | Pinch stem; should feel resilient |
| Age | From this year’s growth | Located at the tips of branches |
In summary, softwood cuttings are sections of new, flexible stem growth harvested during their optimal stage (late spring to early summer). Their unique combination of flexibility and firmness makes them ideal for quick and successful rooting, allowing gardeners to expand their plant collections with ease. Understanding the characteristics of softwood cuttings is the first step in mastering plant propagation through this simple and rewarding technique.
Essential Tools and Materials for Rose Propagation
Before you begin propagating roses from cuttings, it's important to prepare all the necessary tools and materials. Having everything on hand will make the process smoother and increase your chances of successful rooting. Here’s a detailed list of what you’ll need, along with tips on choosing the best supplies for the job:
Tools and Supplies Checklist
-
Sharp, Sterilized Pruning Shears:
Use high-quality pruning shears to make clean, precise cuts on your rose stems. Sterilize them with rubbing alcohol or a bleach solution to prevent the spread of disease. -
Rooting Hormone Powder or Gel (Optional but Recommended):
Applying rooting hormone encourages faster root development and improves the success rate, especially for beginners or hard-to-root varieties. Both powder and gel forms are effective; choose whichever is more convenient for you. -
Clean Pots or Trays:
Select small pots (3-4 inches wide) or seedling trays with drainage holes. Clean containers help prevent fungal or bacterial infections in your cuttings. -
Well-Draining Potting Mix:
Roses need a light, aerated mix for healthy root growth. A blend of peat moss and perlite is ideal, but you can also use a commercial seed-starting mix. Avoid heavy garden soil, which retains too much moisture and can cause rot. -
Clear Plastic Bags or a Propagation Dome:
Covering your cuttings with clear plastic helps maintain high humidity, which is crucial for root formation. You can use large zipper bags, plastic wrap, or a specially designed propagation dome. -
Spray Bottle with Water:
Keep the potting mix moist (not soggy) by misting regularly. A fine-mist spray bottle ensures gentle watering without disturbing the cuttings. -
Labels and a Pencil:
Track the variety and date of each cutting by labeling your pots. Use a pencil or waterproof marker—ink can fade or run when wet.
Additional Helpful Items
While not strictly necessary, these extras can make the process easier:
- Gloves:
Protect your hands from thorns while handling rose stems. - Rooting Tray with Heat Mat:
Bottom heat (around 70°F/21°C) can speed up rooting for some rose types. - Antifungal Powder:
Dusting cut ends can help prevent rot in humid environments.
At-a-Glance Table
| Item | Purpose | Tips |
|---|---|---|
| Pruning Shears | Cut stems cleanly | Sterilize before use |
| Rooting Hormone | Boosts root growth | Apply to cut end |
| Pots/Trays | Holds cuttings | Ensure good drainage |
| Potting Mix | Supports and nourishes cuttings | Use a light, airy blend |
| Plastic Bag/Dome | Maintains humidity | Remove occasionally for air exchange |
| Spray Bottle | Keeps cuttings moist | Mist daily, avoid waterlogging |
| Labels & Pencil | Tracks varieties | Mark date and rose type |
Gathering these essentials before you start will set you up for propagation success and make the process enjoyable and efficient.
Detailed Step-by-Step Instructions: Propagating Roses from Softwood Cuttings
1. Selecting and Preparing the Parent Rose Plant
To ensure successful rose propagation, it’s crucial to begin with a robust, disease-free parent plant. Look for a rose bush that displays healthy, lush foliage and vigorous new growth, as these characteristics indicate strong genetics and resilience.
Best Practices for Selection:
- Choose stems that have not yet flowered, as these are less woody and root more readily.
- Early morning is the ideal time to take cuttings since the stems will be fully hydrated, reducing stress on the plant.
- Avoid any stems showing signs of disease, pests, or damage.
Quick Tip: Refrain from using stems with buds or blossoms, as these will divert the plant’s energy away from root development and decrease the chances of successful propagation.
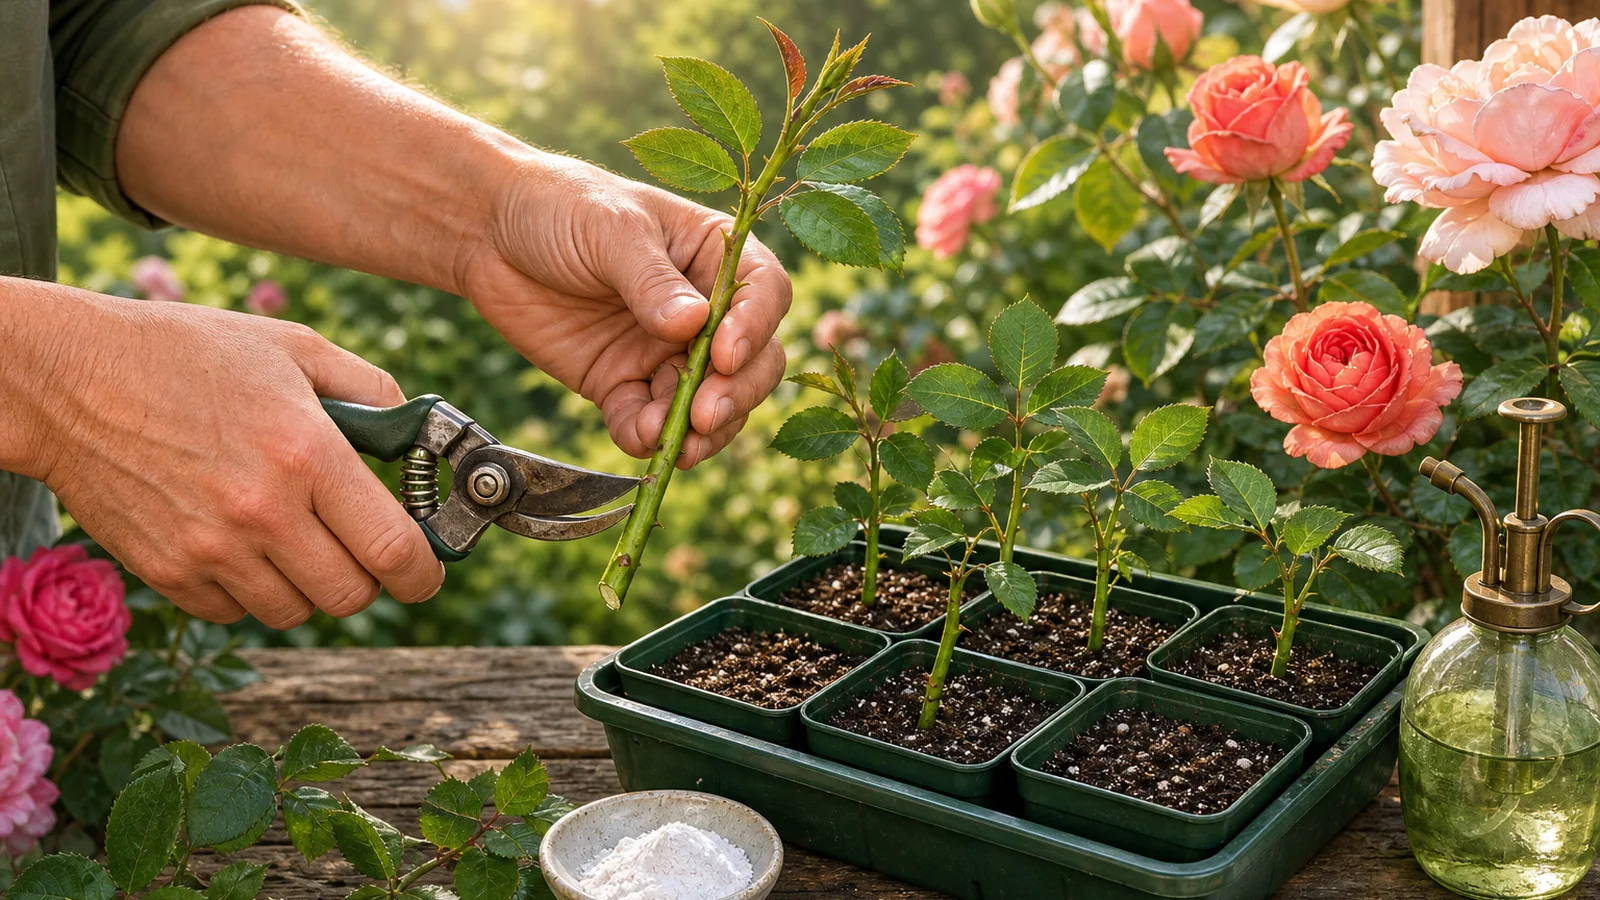
2. Taking the Cutting: The Right Way
- With sterilized pruning shears, snip a 6–8 inch section of fresh, green stem, making the cut just below a leaf node (the small bump where leaves emerge).
- Remove all leaves except for the top two leaflets. This step minimizes moisture loss and helps the cutting focus energy on root development.
- If you see any flower buds or blooms, pinch them off to further encourage rooting.
Tools Needed:
- Sharp, clean pruning shears or scissors
- Gloves (optional, for thorny varieties)
3. Using Rooting Hormone for Better Success
After preparing the cutting, dip the freshly cut end first in water, then into a rooting hormone powder or gel. While using rooting hormone is not strictly necessary, it can significantly increase your chances of successful rooting, especially for beginners or when working with less vigorous varieties.
Types of Rooting Hormone:
- Powder (easy to apply, widely available)
- Gel (adheres well to stem, often preferred by professionals)
4. Planting the Rose Cutting Correctly
- Fill a clean pot or seed tray with a well-draining, moistened potting mix. A mix of perlite, vermiculite, or coarse sand blended with peat moss or coco coir works well.
- Use a pencil or stick to make a planting hole in the mix. This prevents the rooting hormone from rubbing off as you insert the cutting.
- Insert the rose cutting about halfway into the soil, ensuring the leaf node is just below the surface.
- Gently firm the soil around the cutting to support it and eliminate air pockets.
Recommended Potting Mix Table:
| Ingredient | Purpose |
|---|---|
| Perlite | Improves drainage & aeration |
| Vermiculite | Retains moisture |
| Peat Moss | Maintains consistent moisture |
| Coarse Sand | Enhances drainage |
5. Creating the Perfect Humid Microclimate
Cover the potted cutting with a clear plastic bag or place it under a propagation dome. This helps maintain high humidity—a vital factor for root initiation.
Pro Tip: Use sticks, chopsticks, or small stakes to prop up the plastic so it doesn’t touch the leaves. This minimizes the risk of fungal diseases and ensures adequate airflow.
6. Providing Optimal Growing Conditions
- Place the covered pot in a location with bright, indirect sunlight. Avoid harsh direct sun, which can scorch tender cuttings.
- Keep the potting mix consistently moist but never soggy. Mist the cutting as needed with a spray bottle, especially if humidity drops.
- Aim for a temperature range between 65–75°F (18–24°C), which is ideal for root development.
7. Monitoring Root Development and Next Steps
Root formation typically takes 3–6 weeks. To check progress, gently tug on the stem after a few weeks. If you feel resistance, roots are developing. Once established, gradually acclimate the new plant to normal room conditions before transplanting it outdoors.
By following these detailed steps, you’ll maximize your chances of successfully growing beautiful new roses from softwood cuttings.
Essential Aftercare: How to Successfully Transplant and Grow On Your New Rose Cuttings
Once your rose cuttings have developed strong, healthy roots that are about 2–3 inches long, it’s time to move them to a larger container or directly into your garden. This critical step in the propagation process ensures your new roses have the best chance to thrive and mature into robust, blooming plants. Proper aftercare and a smooth transition from propagation to garden life are key to long-term success.
Step-by-Step Guide to Transplanting Rose Cuttings
-
Choose the Right Location or Pot:
- If planting in a pot, select one at least 8–10 inches deep with good drainage.
- For garden planting, pick a spot with at least 6 hours of morning sun, and ensure the soil is rich, well-draining, and slightly acidic (pH 6.0–6.5).
-
Prepare the Soil:
- Amend garden soil with compost or well-rotted manure for extra nutrients.
- For containers, use high-quality potting mix blended with perlite or sand for aeration.
-
Transplant Carefully:
- Gently remove the rooted cutting from its propagation medium, taking care not to damage the delicate roots.
- Plant at the same depth as it was during rooting, firming the soil gently around the roots.
-
Water Thoroughly:
- Immediately after transplanting, water the plant deeply to settle the soil and eliminate air pockets around the roots.
Hardening Off: Gradual Acclimation to Outdoor Life
Before exposing your new rose plants to full outdoor conditions, it’s important to acclimate them to prevent transplant shock. Follow this gradual process over 7–10 days:
- Day 1–3: Place the potted plant outside in a sheltered, shaded spot for a few hours, then bring it back indoors.
- Day 4–6: Increase outdoor exposure to half a day, introducing dappled sunlight.
- Day 7–10: Allow the plant to spend a full day outdoors, with some morning sun. Avoid harsh afternoon rays.
- After 10 Days: Your rose should be ready to remain outside or be planted in the ground.
Key Care Tips for Young Roses
To ensure your young rose plants establish quickly and remain healthy, follow these essential care practices:
-
Consistent Watering:
Keep the soil evenly moist, especially during the first few weeks after transplanting. Avoid both waterlogging and drought stress. -
Sunlight Management:
Shield new plants from intense midday sun until strong growth resumes. Light morning sun is ideal during the adjustment period. -
Mulch and Fertilizer:
Apply a thin layer of organic mulch to retain moisture and suppress weeds. Begin light feeding with a balanced, slow-release fertilizer after a month. -
Monitor for Pests and Diseases:
Check regularly for signs of aphids, mildew, or black spot. Early intervention with organic sprays or manual removal is best. -
Support and Pruning:
If stems are weak, provide gentle support with stakes. Prune only dead or damaged growth during the first year.
By following these transplanting and aftercare steps, you’ll set your propagated rose cuttings on the path to vibrant, healthy growth and an abundance of blooms in seasons to come.
Frequently Asked Questions About Propagating Roses from Cuttings
Propagating roses from cuttings is a popular and rewarding gardening technique, but it often comes with a few uncertainties for beginners and seasoned growers alike. Below, we address some of the most common questions to help you achieve the best results when starting new rose plants from cuttings.
When is the Best Time to Take Softwood Rose Cuttings?
The optimal time to take softwood cuttings from roses is during late spring to early summer. At this stage, rose stems are still flexible, green, and actively growing, which makes them ideal for rooting. The plant's natural growth cycle supports rapid cell division, increasing the chances of successful root development.
Why this timing works best:
- Softwood is pliable: Easier to cut and handle without damaging the parent plant.
- Active growth: Higher hormone levels in the plant encourage root formation.
- Warm temperatures: Promote faster rooting and reduce the risk of rot compared to colder months.
Should I Use Rooting Hormone When Propagating Rose Cuttings?
Using a rooting hormone is optional, but it's highly recommended—especially for those new to rose propagation or dealing with rose varieties that are known to be more challenging to root. Rooting hormones, available in powder, gel, or liquid forms, contain auxins, which are natural or synthetic plant hormones that stimulate root growth.
Benefits of using rooting hormone:
- Increases the chances of successful rooting.
- Speeds up the rooting process.
- Reduces the risk of disease by creating a healthy environment for new roots.
Tip: If you don't have commercial rooting hormone on hand, some gardeners use natural alternatives such as honey or willow water, though these may not be as effective as synthetic products.
How Long Does It Take for Rose Cuttings to Root?
Generally, rose cuttings take 3 to 6 weeks to develop roots, but this timeframe can vary depending on several factors:
| Factor | Effect on Rooting Time |
|---|---|
| Temperature | Warmer temps speed up rooting |
| Humidity | High humidity prevents drying |
| Rose Variety | Some root faster than others |
| Cutting Condition | Healthier cuttings root faster |
| Use of Hormone | Typically faster with hormone |
It's important to regularly check your cuttings by gently tugging after a few weeks to see if they resist, which indicates new roots have formed. Be patient; some cuttings may take longer, especially if conditions are less than ideal or if you're working with old wood instead of softwood.
More Questions?
If you have more questions about propagating roses from cuttings, feel free to ask or consult with your local gardening extension office for advice tailored to your climate and rose varieties. With patience and the right techniques, you'll soon enjoy healthy new rose plants grown from your own cuttings!
Troubleshooting Common Reasons Rose Cuttings Fail to Root
If your rose cuttings aren’t taking root as expected, don’t get discouraged—successful propagation can be a delicate process. Understanding the most common reasons for failure helps you quickly address issues and improve your chances for lush, healthy new plants. Let’s break down the typical pitfalls and how to overcome them:
1. Improper Watering
Water is crucial for rooting, but both overwatering and underwatering are common mistakes:
- Overwatering: Soggy soil suffocates roots, encouraging rot and mold. Make sure your potting mix drains well and never let cuttings sit in standing water.
- Underwatering: Dry soil causes cuttings to wilt and die before roots have a chance to form. Keep the soil consistently damp to the touch, like a wrung-out sponge.
Tip: Use a spray bottle to mist the soil surface, which helps maintain moisture without flooding the cuttings.
2. Low Humidity
Humidity is essential for rose cuttings because, without roots, they rely on atmospheric moisture to stay hydrated. If the air is too dry, the cuttings may shrivel and fail.
- Always cover your cuttings with a clear plastic bag, dome, or propagator lid to trap humidity.
- Open the cover occasionally to let in fresh air and prevent mold buildup.
Bonus: Placing the pot on a tray of pebbles with water underneath can further boost humidity around your plants.
3. Insufficient Light or Incorrect Temperature
Rooting is most successful in bright, indirect light and warm conditions:
- Light: Place cuttings near an east- or north-facing window, or use a grow light. Avoid direct afternoon sun, which can scorch tender stems.
- Temperature: Aim for a consistent range of 65–75°F (18–24°C). Cooler temperatures slow rooting, while excessive heat can dry out or stress cuttings.
| Condition | Optimal Setting |
|---|---|
| Light | Bright, indirect |
| Temperature | 65–75°F (18–24°C) |
4. Choosing the Right Rose Stems
The age and condition of your cuttings matter:
- Old, woody stems are slow to root, if at all, because they’re less flexible and have lower levels of rooting hormones.
- Fresh, green growth (semi-hardwood taken just after flowering) is much more likely to root quickly and vigorously.
How to select: Look for healthy stems that bend without breaking and have several leaf nodes.
5. Additional Tips to Improve Success
- Sterilize tools before taking cuttings to prevent disease.
- Dip cut ends in rooting hormone to stimulate faster root formation.
- Be patient: Some rose varieties take several weeks to show signs of rooting.
By monitoring these factors and making small adjustments, you’ll greatly increase your chances of propagating beautiful new rose bushes from cuttings. Happy gardening!
Conclusion: Why Growing Roses from Softwood Cuttings Is Rewarding and Sustainable
Growing roses from softwood cuttings is more than just a cost-effective propagation method—it’s a rewarding gardening experience that allows you to multiply your favorite rose varieties in an environmentally friendly way. Whether you’re an experienced gardener or a beginner eager to expand your garden, propagating roses from cuttings offers numerous benefits for both you and your landscape.
One of the greatest advantages of this method is that it enables you to preserve the unique characteristics of your favorite rose bushes. Unlike growing roses from seed, which can result in unpredictable offspring, taking cuttings ensures that the new plants are true clones of the parent bush. This means you can reliably reproduce beautiful blooms, colors, and fragrances that you cherish.
Benefits of Propagating Roses from Softwood Cuttings
Consider these compelling reasons to try rose propagation from softwood cuttings:
- Cost Savings: Skip the expense of purchasing new plants. With cuttings, you can expand your rose collection for free.
- Eco-Friendly: Propagation reduces the need for commercial production, which often involves chemical treatments and shipping.
- Customization: Create a garden filled with your favorite varieties, tailored to your preferences.
- Sharing and Gifting: Homegrown roses make thoughtful gifts for friends, family, or community gardens.
- Educational Value: Learning the process enhances your gardening skills and deepens your understanding of plant biology.
Tips for Successful Rose Propagation
To ensure your success, keep these practical tips in mind:
- Choose Healthy Parent Plants: Always start with disease-free, vigorous rose bushes for the best results.
- Use the Right Tools: Sharp, clean pruners prevent damage and reduce the risk of spreading disease.
- Monitor Moisture: Keep the rooting medium consistently moist but not waterlogged to prevent rot.
- Be Patient: Rooting can take several weeks. Resist the urge to disturb cuttings too soon.
- Label Your Cuttings: If you’re propagating multiple varieties, labeling helps you keep track as they grow.
Embark on Your Rose Propagation Journey
Are you inspired to cultivate your own rose bushes from softwood cuttings? Gather your supplies, select the healthiest stems, and follow the propagation steps outlined in this guide. With a little patience, you’ll soon enjoy the satisfaction of seeing new growth emerge—each plant a testament to your care and dedication.
Remember, rose propagation is both an art and a science. Don’t be discouraged by initial setbacks; every attempt brings you one step closer to mastering this time-honored gardening technique.
Start today and discover the joy of growing roses from softwood cuttings. Your garden—and those you share your new roses with—will thank you. Happy gardening! 🌹